Sunday 31 July 2011

Sentosa Cove in bad weather

We do not need to have great weather to have good pictures. A few posts earlier, the picture of the airplane in rain demonstrated that image was less likely to have been taken by some one else, which means that picture was unique. Whether it is technically perfect is not always so important. Many times, the picture at the right moment is more important than a technically perfect picture but with no meaning. Remember, ask ourselves a very simple question after we press the shutter release - is this picture repeatable tomorrow at the same time?

I have been using different cameras for different shot posting on this blog. I am not saying the camera is not important, but not so important that I seldom talk about my camera. The latest development in Singapore is that there are more people willing to spend hundred of dollars on a half case (not even a full case), hundred of dollars of a "thumb something" which does not really help with picture taking. Yes the picture could be less shaky, but you can alway manage this through higher shutter speed, large aperture, high ISO. In another word, nowadays camera is more for wearing than for picture taking.

So much so in my opinion.

I was happily visiting Sentosa Cove property together with my favorite camera and lens.


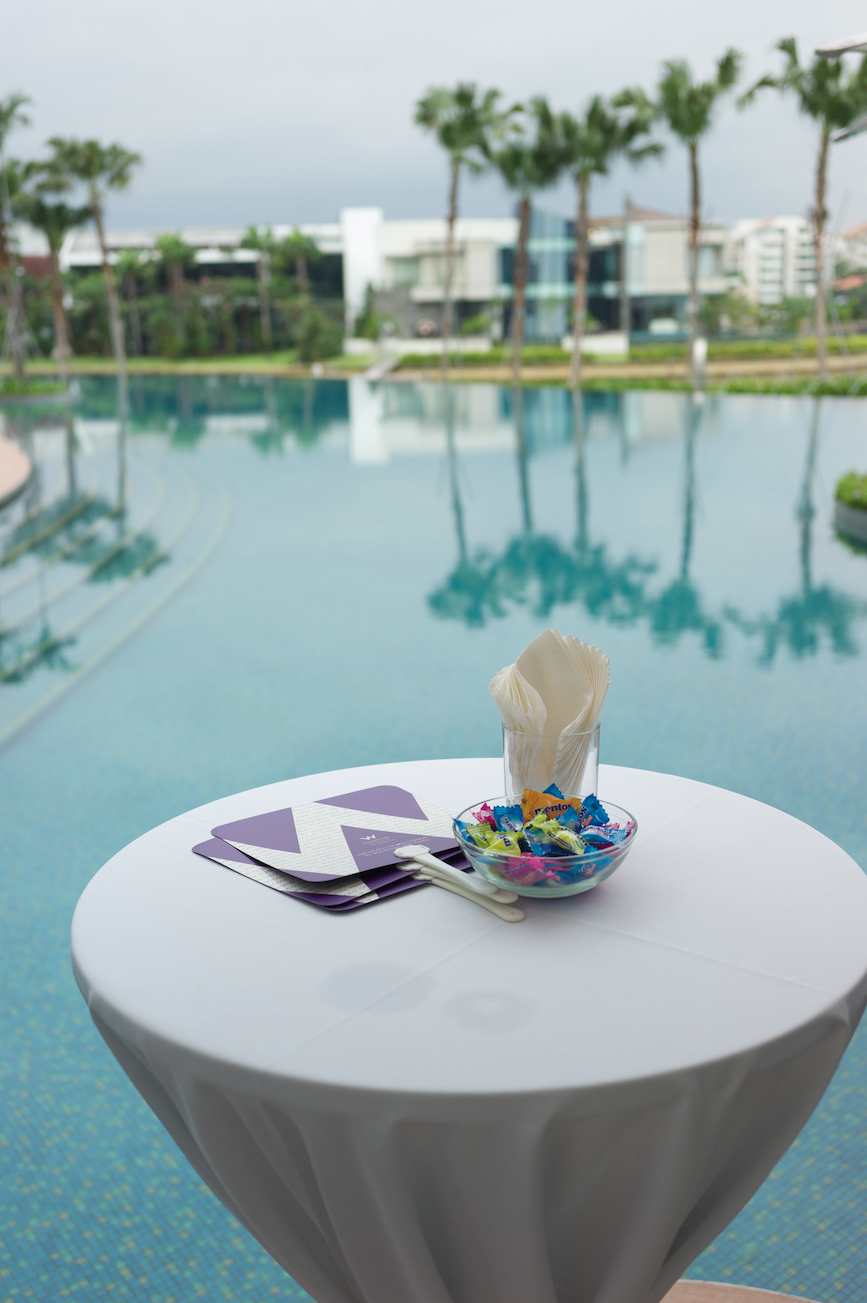
Taken with 35mm, but in order to blur the background, I really have to get very close to the table. That is right, you can still get blur background with a wide angle len, the trick is to get as close to the near subject as possible.


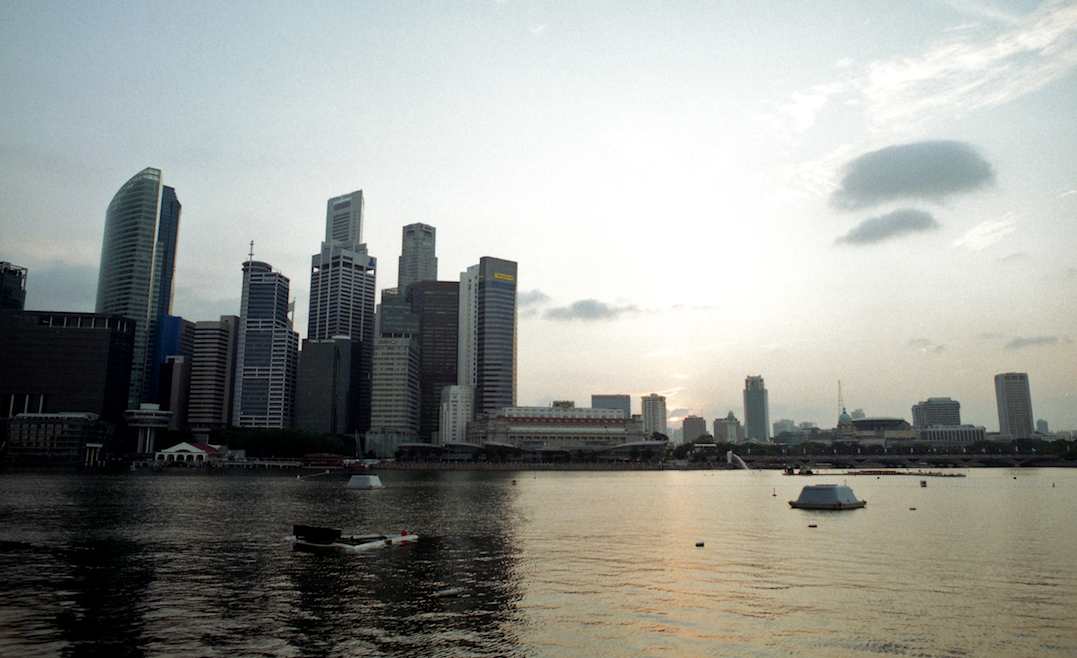
However, halfway to the show flat, the weather turned very bad. I like the thunder cloud which was so intense, so dangerous, yet so complex. I no longer need to worry about the sky being blown out, instead, the sky is the key point of interest. The color was also quite saturated.


This is another grab shot, with only seconds before the rain started pouring, I saw this blue tone -  the pier, the houses, the water, the sky all blended under the thunder storm in blue. This simplified the color yet created great brightness range and tone.  My friend actually asked me to print a copy for her collection I hope she did not send this to Far East development for their brochure of Sentosa Cove and earn a few cents.

10 seconds after this shot was taken, we all ran for cover as the rain was like our bathroom shower. No worry, the camera got a few rain drops here and there, wipe and air dry and works like a charm. 


Thursday 28 July 2011

Marina Bay Area (2)

I realized that I have not finished my posting of Marina Bay Area because I was too excited with the pictures of sunshine inside Singapore Air.


This is the building of the Singapore Art and Science museum, a place where technology is used to enhance the experience with arts. I went there, paid a hefty entrance fee and was totally immersed in the experience. If you feel that SGD 30.- is not acceptable, go and apply an OCBC credit card, you will be given 20% discount. Opening hours from 9:00 am to 10:00pm ( I hope I remember correctly.)


Another view of Marine Bay Sands. With an extra wide angle, I de-emphasized the height of the three hotels, and turn it into something more friendly. I hope this is the first view from this angle because I quite like this picture.


Even with buildings, try to look at it from different angle and create different composition. This is another picture of the art and science museum, but only recorded partially to give a different perspective.


Another view of the Marina Bay Sands, only this time is from reflection.


Sun set at Marina Bay. Correct it is sunset. From my experience, the sun moves so fast downward during the last minute of sunset , I was running away from my friend without any sign of notice. This was just to find an angel to show the setting sun. The picture was taken twice, in the second picture, the sun was already too low for any interest. Lesson to learn is to quickly take as many photo as you can because the moment only lasts in a matter of seconds.

Saturday 23 July 2011

Air-Land Travelling

Have been away for the new job training, not possible to post anything without first go through the digital workflow to maximize the picture-ability before posting.


The camera is my trusted Olympus EPL-1 with Panasonic 20mm F1.7. The picture was taken inside the HK-Guangzhou speed train. (Speed mean fast, but not high speed which is faster, and then the ultra high speed which mean fastest. Just like in the financial business there is priority segment, high net worth, then ultra high net worth). I reached GZ in 2 hours, which is ok but not too good or too bad. Not worth to remember.


On the way back, we stopped at the HK/Shenzhen border for a while, and sat side by side with a local train, I think this one is neighbourhood service because I saw a lot of passenger standing.


But yet, there is still food available. So is toilet. However, once the train touches Hong Kong track, the toilet is not available. Please do not try to walk on the rail track when you are in China , firstly it is not safe with so many different trains speeding along, and secondly it is contaminated with organic fertilizer.


Now for something more pleasant.

When I am on business, or travelling by air on J class, I always sit at the window. Many pictures were taken of the cloud, the wing, the engine, the moon, but non happened as fast and dramatic as today. We were asked to stay up at 41,000 feet to make space for the air parade rehearsal preparing for the Singapore national day celebration. While the A380 was cruising, the sun was setting. I saw a bright light suddenly beamed from the cloud and I quickly dashed to the floor to grap my camera from my briefcase. Everything was in automatic mode, I tried to let the camera focus at the rim of the window to show details and contrast made by the beam. I know this picture is not repeatable, therefore I kept shooting using different composition, different angle , different focus points. Here are a few which is after post processing. I like the second picture best.


Watching sunset in the plane.


Even a boring window frame which I am sure not many passenger notice that it is oval with double glass gets interesting with the sun light.

Putting sunset and the plane engine in the same picture.

Friday 15 July 2011

Marina Bay Area

A nice little walk on sunday afternoon is very relaxing especially when you realised that there are so many interesting building to picture.

Start with the landscape.


So much is the build up at Marina Bay area it is like visiting another city, I kept shooting until the film ran out. This was not a digital shot, so there were post processing done at home which took another weekend, but what I get is a picture with stunning detail. This was from film.


Under the bright sun, colours pop out without any adjustment, the colour saturation is very rich. A lot of people has taken pictures of MBS but most of them are quite simply snap shots , which is generally another picture of the three pillars. I was lucky when there was a weekend carnival with colourful balloon as decoration. This was a shot which will most likely non-repeatable. Ask ourselves when we take landscape pictures, especially of buildings, whether we can repeat the same picture if we stand at the same spot tomorrow, if the answer is not repeatable, then likely the picture is acceptable. So is this picture repeatable the next day? The answer is no.

OK let me bore you with another picture which is possibly repeatable, therefore I try to use a different angle to make it interesting.


The same landscape, but using a different foreground will give a different picture. The building in front helped to cover up most of the sky which is a main source of boring pictures.


Since I also have female readers, I have to show something colourful. This was taken the second week after the lovely picture of another flower bud I posted about 2 weeks ago. I did not have my telephoto len with me, so this is a crop of the original picture. The camera used was a digital camera with 10 mega pixels. The crop is about 1/20 of the original picture, yet the result is quite acceptable. The quality of the picture is like taking this same shot with a point and shoot camera.

More to post..

Tuesday 12 July 2011

Bad Weather

Surprising that I still have thoughts to post! During weekdays, probably I can only post something lighter. In the past two weekends, I posted serious stuff which is not so easy to digest, but all these thoughts were results of  accumulation of testing, trying, reading. Whatever I say, I believe so and tried. I never copy from books or from anybody's website, everything is originally written. May be after I eventually finish posting , I can even publish the content of this blog and make a few cents since I have no link to even Adsense.

Shall we take picture in bad weather? Many of us put away our camera when there is even one droplet of rain. Relax, cameras are more rugged than you can imagine. As long as it is not pouring, as long as water never goes inside the camera, it is fine after you give it a wipe dry but don't put it away until next morning. This will allow all moisture to air dry. Of course, I do not expect anyone to use a hair dryer!


I arrived a few years ago from Xian to Hong Kong using Dragon Air, being a service "budgetted" airline, we disembarked in the middle of the open airfield miles away from the bridge. It was pouring with heavy rain. I managed to squeeze into the bus and saw this through the bus window. Rain water was running down the glass, however, the sky was bright enough to give this sufficient exposure. Poor Dragon Air Staff was standing in the rain, barely covered with a SGD 2.- rain coat. I still remember the camera was Leica M4, with Fuji ISO 400 negative colour film, through a 35mm F2 summicron (my favourite focal length). The camera was safe, but the sense of heavy rain was so evident. The picture is a powerful memory peg of the moment.

Next time I will post more picture in bad weather but with a different story to tell.

Sunday 10 July 2011

Shapes and Pattern

Another difficult subject! (Anyway, today is Sunday, so I can think harder on what to post and try to tackle subject which is always hard to grasp).

When we learn drawing, we normally start with a pencil, a drawing paper and a cube. We were then asked to re-create the image of the cube on paper. Most of the time we would stare at the subject, then look at the paper, not knowing what to do.

The process of converting an image to paper has difficulty because when we look at the subject, it is a combination of shades, where as the paper is like a glaring light source. The mind has to cover the paper (thus the light) with shapes and shades to recreate the subject on paper - the conversion process is elimination not addition. We are so used to draw something on paper, but have we ever tried to eliminating the light to show the subject. Give it some thought. (Not that I am a good painter or anything, but I once tried this theory on paper and the result was shockingly good, care to try for yourself?) There is a book on "drawing with your left hand upside down" (this is for the right hand user, for the left hand user, it should be named as "drawing with your right hand, but still upside down" or likewise).

How we can use this theory in photo taking. Try to think in terms of light. Light is the number 1 reason of photo taking. Start looking at the scene and ask the first question: How is the light creating the picture? Work hard on it and try asking again and again before just shooting off.


Did I mention that some subject looks difficult but very easy to capture? This subject looks easy, but very difficult to take. I probably took about 6 to come up with the right exposure, right shape, right pattern etc. Is this impressive, you may not think so, but try to enlarge it and imaging this is hung on the wall, I am sure it can attract some attention (haha I am so proud of this weird picture. Now can any one tell me where was it taken?)

To ask the question: What is the light doing here? The light is creating a pattern from the pillar, so I went close to focus on the shapes and shades, the difficult part is how to get both the shadow and highlight with sufficient detail so that neither is blacken or blown out. Ansel Adams is an expert in the zone system, however, in colour, and especially in digital, the exposure latitude is so much narrower, therefore we have to shoot RAW and use software to create the desired result, there is not point and shoot survivability here.


Consider this as an exercise to train your eye to see what the light is doing there. This was taken in national museum of Singapore, this is part of a resting seat. When I saw this, the pattern and light immediately attracts my attention. I shot 2 pictures to exclude some more portion of the seating area. I used software to straighten the vertical line.

After a while, when you encounter a subject like this you will be able to spot it immediately.


Regular reader will now notice that I am quite fond of using colour to represent monochrome, all three pictures here are of only one colour (well almost for the second picture), but with different tone of the same colour. Easy, tough? Neither, as long as we are used to the process of converting 3D image to 2D, eliminate excess light, excess shapes, excess shades, excess subjects, excess composition, excess colour, excess sky, excess ocean. Focus on the subject that you want to tell, shoot with different camera orientation - landscape mode, portrait mode. Keep trying, there is never right or wrong. If in the end, you still struggling, then try to shoot picture of camera like all the hundreds of blog out there which talk about camera but seldom show a picture, even if they show a picture, there was very little discussion on why it was taken, what it tried to tell.

A picture is worth a million words, show a million and one words with 10 pictures, but throw away nine of them. Don't be shy to shoot more, because you may never get the right picture with one shot, unless you are a trained sniper - which I know you did not finish sniper school, so shoot more.

Labels: , ,

Wednesday 6 July 2011

A Picture is Always Near Us


Can any of my friends guess where was this picture taken. The composition is great because of the curve and lines, the position of the lift was just right, exposure was hmmm...

The picture attracts my eyes. Try it for yourself, look at the picture with your eyes half closed. ... Do you feel that your eyes keep looking at different part of the picture trying to find something, it is that good that your eyes never want to leave the sight. It has so much detail, causing the reader to keep looking, looking..


Any guess, please post in your comment. For those friends who tried to leave a comment, please click the right panel on today's subject, you will then be able to leave a message. I have been too lazy to add or change the appearance of my blog. Please pardon me for you inconvenience.

Oh, the prize : Any correct guess will be getting a hand printed, signed photography of any picture in this blog, just have to leave your address and contact and describe the picture correctly. (BTW, this is only for Singapore and Hong Kong only). This ends on saturday night i.e. 9 July 24:00.

And , to further enhance the picture, I used software to pull the highlight curve lower.  The end result:


Do try to download this and view it on your bigger computer screen, I hope you like it.

Did I mention this looks like a STAR WAR launch station?!

N.B. This picture was taken by Shireen Ng, a good friend and the creator of http://sightsmelltaste.blogspot.com. If you don't know where to find good food, it is just a click away.

Saturday 2 July 2011

The Most Difficult Topic - Exposure

Inspired by the sudden power off in my building during a rare gathering of my team.

Many times when we used our camera, set everything to auto and expect perfect result, sometimes we feel that the camera has not done its job to capture the right exposure. The modern camera is very smart to know how to interpret light, but in some occasions the exposure cannot be accurate without certain adjustments.

Let me show you a few examples and you will know what am I talking about. All three photos are not supposed to be technically perfect, it is a demonstration, but for fear of the copyright penalty, I dare not take existing samples from internet or books.

All three are shot with spot metering taking the exposure off the exposure card.

Metered the black card.

Metered the white card


metered the grey card.

You can see all three exposures were different. Why? Much was written about this, but we all tend to focus on too much technical explanation. Let me try to simplfy the explanation: .

The meter is taking the world as a average of black, white and everything in between.


Because the camera treats everything as average grey, it is very easy to be fooled. In the above examples, the black card was reproduced as grey, the white card as grey and the grey card, of course as grey. Since the reference light reflected is considered grey, the exposure with the black card has too less light reflected, therefore the camera increases more exposure to make it seen as grey. Similarly for the white card the camera thinks that the light is too bright, therefore reduced exposure. The grey card is neutral, therefore it should be correct.

The three pictures were a bit underexposed because even after light is restored in my apartment, it is still not bright enough. (joking). Anyway, I hope you see what I am trying to say because this is the most difficult subject to explain, came back next week after you experienced for yourself.

What is the result of such exposure? Since the exposure is not correct,  your pictures are ruined. Don't go and sue the camera company because exposure is the most difficult subject and we have not talked about different exposure for different colour yet.

The examples show that if you have a dark subject, similar to the one with the black patch in the middle of your picture, the surrounding subjects will be recorded too bright, so please use the +/- button to reduce exposure by - 0.5 to -1.


Similarly, if the subject is bright, eg. a guy wearing white, you should remember the second example which was under exposed and increase exposure by +0.5 to +1.


Can you see the flower is now captured very similar to the original?


If the subject is a bit average in brightness, then you can trust your camera's autoexposure.

The one taken on grey card is reproduced here again for easy reference.

For colour, it is a bit more complicated. As a general rule, for bright colour e.g. orange, yellow the exposure may need to be increased by +0.3 to +0.7

For dark brown, dark green , the exposure should be reduced by -0.3 to -0.7.

Now, the most difficult to understand subject has been covered. So, do you still trust your camera? For purist, trusting your camera's exposure should not be your practice anymore because if you are seeking perfection at the moment when you press shutter, then without taking into consideration the error made by the camera, you will always have about 30% of your picture off the correct exposure. Some can be adjusted in post processing through software, some cannot, (anyway you will not do any adjustment because you are a purist).  You want to be a purist, you want the direct OOC (out of camera) image to be perfect, however, trusting your camera's exposure is not something a purist should pursue.

Labels: ,